Tag Archives: Junk journals

Faux Leather for journal covers

Only two members showed up for my faux leather session. We were turning paper grocery bags into a leather textured material for journal covers.

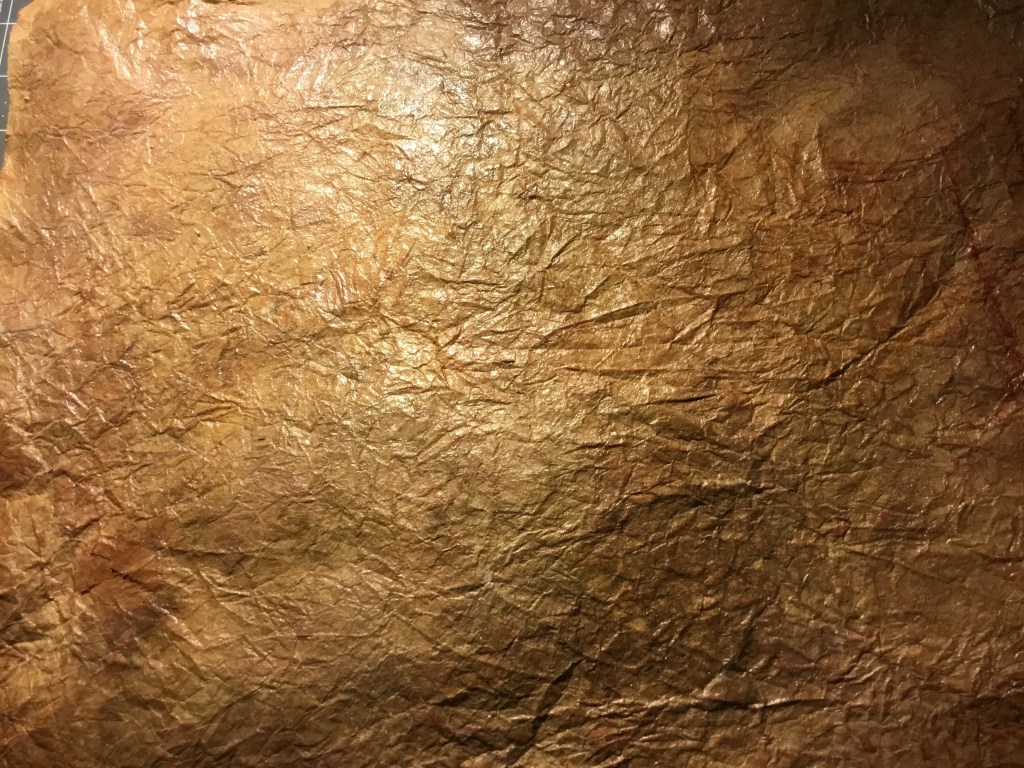
There are a number of videos on YouTube and several blog posts about the process. The technique we used consisted of opening a bag’s seam, smoothing it somewhat flat, and trimming it into a rectangle. Then it was sprayed either with plain water or a mixture of water and a softening agent such as glycerin, hair conditioner, or hand lotion. We used hair conditioner mixed one part conditioner to two parts water in a spray bottle.

After spraying the paper, we crumpled it and squeezed it in several different directions to form wrinkles of varying sizes. We smoothed our papers, sprayed the paper with more of the conditioner mixture, and crumpled the paper again. We smoothed and sprayed and crumpled until we were satisfied with the texture.

Our next step was to smooth the paper, and dab diluted acrylic paint in various shades of brown onto the surface with cosmetic sponges and brushes. We used a heat gun to damp dry the paper and apply more paint. Once we were satisfied with how our sheets looked, we used a heat gun to dry the base.

Once the surface was dry, a couple of coats of Mod Podge were applied to give a shine like finished leather to the paper, allowing each coat to dry before applying the next coat.

The faux leather is somewhat fragile and should be lined with something like muslin or even paper. The lining should be glued on with a glue such as Beacon 3-in-1 or Aleene’s Fabric Fusion if using fabric or Aleene’s Tacky Glue if using paper as a lining. I also advise sewing the faux leather and lining together around the edges after trimming the piece to the size you want.

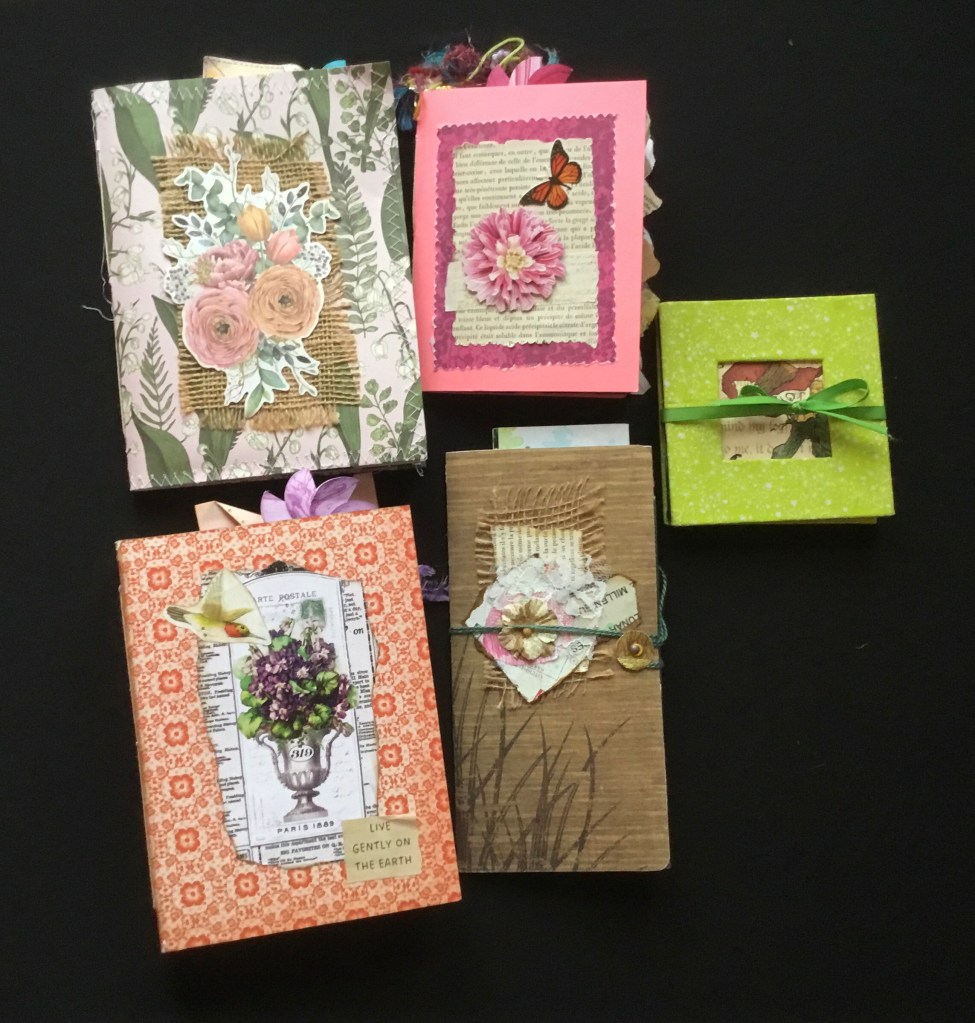
The faux leather can be used as a binding for a journal. It can be cut into shapes for embellishments. And with care, can be used for earrings if a stronger sealant is used on both sides. It won’t be something to be used for items that get a lot of handling or wear, but you can experiment and find out what works.

A sheet of Faux Leather from a grocery bag.
A journal covered in Faux Leather.

The sale went great.

I did well with sales. Some of the vendors had large objects so they undoubtably made more money from a single sale than I did with my many little ones, but I was pleased with the results. I finally found the right venue for selling one of a kind books.

I feel I had enough products to give people choices of styles and sizes and a good variety of book types from sketchbooks, to journals, to zines with different types of binding methods and pages. No one bought the faux leather journal, but that’s okay. There were questions about it and several people expressed an interest in my book making classes.

All in all, I feel I had a successful and profitable sale.

I’ve been so busy, I forgot I have to maintain a blog.

This is what happens when I take on too many projects at one time. I need to schedule my time and try not to do so many projects at once. Prepping for a craft show, taking two classes, dog-sitting a dog with anxiety, knitting, weaving, and just generally losing control on my time is getting almost nothing accomplished.

There are other things that are scheduled like hosting a weekly event, teaching a monthly class, attending a couple of weekly meetups – not Meetups – that go on. And I have all sorts of paper planners and scheduling software that could make things easier, but I still can’t keep organized. Yes, recurring events are on the calendar, but apparently, I need a daily schedule, even for things like “do the dishes” and “clean the bathroom” and “take the pills that are saving your life” since I still manage to occasionally skip a dose.

I used to make lists and that’s what I need to start doing again. Make a list of everything I want to accomplish one day at a time. Thanks for reading. I’ll let you know how it goes.

These are some of the items for the craft show. Junk journals, a folio, and an explosion book.

And May the 4th be with you,

Book Cloth

Today I made some book cloth to use on junk journal covers. It’s very easy to create colorful covers with do-it-yourself book cloth. I had been planning to make for a few months and finally decides to do it.

A colorful assortment of book cloth.

Anyone can make their own book cloth using fabric, tissue paper and a fabric bonding agent. What I used was a fat quarter bundle from Joann Fabric and Crafts, a product called Heat ‘n’ Bond, also from Joann’s, and white tissue paper from the No-longer Dollar Store.

For those who don’t sew, a fat quarter is the equivalent of a quarter yard of fabric. However, it is very different from a regular quarter yard. A quarter yard of fabric will be a nine-inch wide strip cut across the width of the fabric. A fat quarter is a yard of fabric cut lengthwise and crosswise to form four rectangles around 18 by 22 inches or slightly more depending on whether the fabric is 32 inches wide or 44/45 inches wide. Individual fat quarters can be bought or they may be bundled with coordinating colors or patterns.

Heat ‘n’Bond can be bought by the yard off the bolt or prepackaged. The light hold works well since you will only be bonding the fabric to the tissue paper. The book cloth will either be glued to the cover or sewn around the edges. The tissue paper keeps the glue from seeping through the fabric.

You will also need an iron and ironing board, scissors, and a ruler. You don’t have to prewash the fabric. Set the iron according to the recommended setting for the type of Heat ‘n’ Bond you have. Cut the Heat ‘n’ Bond to the size of the fabric piece. Press any wrinkles out of the fabric before placing the bonding sheet down on the wrong side of the fabric. I usually iron in a circular motion, ironing out from the center of the piece. Check the edges to make sure the adhesive is on the fabric and not stuck on the backing paper.

Once you’re certain the adhesive is in place on the fabric, remove the backing sheet by lifting a corner and gently pull up across the sheet. If the iron missed spots, press the area and check again. The fabric should still be warm when you pull up the backing sheet. Lay a sheet of tissue paper on top and iron until the tissue paper is adhered to the fabric. Trim the edges even with the bonded area. Et, voila! Book cloth.

Junk Journal prep

More signatures are ready for the junk journals I’m working on. Thirty new signatures are waiting to be added. The journals are various sizes and will have up to five signatures depending on the width of the spine. Each signature will be trimmed to fit the journal covers. The covers are made of box board – trimmed boxes from frozen pizzas, crackers, tissues, and other boxed products, covered in scrapbook paper or fabric or both. The spines are reinforced with muslin that extends into the hinges.

The signatures are made up of various papers dyed with coffee or gel frosting colors, or magazine pages, maps, drawing paper, lined papers of various colors, and other types of paper. They will be embellished with borders and pockets, stamps, and stencils and collaged pieces.

This stack of paper represents 30 journal signatures.

Hello Again

I’m back. Busier than ever. Since last we met, I’ve joined a makerspace here in Madison, called the Bodgery. I’m the Craft Area Captain. What that means is I’m in charge of a large room filled with almost everything a crafter needs – sewing machines, knitting machines, a heat press, bookbinding supplies, yarn, fabric and even more stuff. I teach members how to use the equipment in the Craft Area, as well as bookbinding, knitting , sewing and papercrafts. I’ll be posting the projects I’m working on as well as a few pictures of classes with the participants’ permission.

Right now, I’m working on some junk journals. Here are two made from return envelopes covered in tissue paper. The inside pages are various papers including magazine pages and scrap papers.